1. Documentation#
This week I was busy getting used to the documentation process. It was a crucial process to understand as I will have to share my whole experience of the course of this page (depends on who you are, but you might have to same job so stay focused). This module will take the format of a tutorial for someone who would be lost on how to build his/her webpage.
Basically there are two main ways you can modify the files on your gitlab repository:
-
working on your files online (on gitlab)
-
working on your files from your computer (using git)
Working from your computer is a little trickier than online, but it avoids clashes when you’re working on files with other people (that’s the whole point of gitlab so you will prefer working with git). More precisely, there is a point where we will be asked to work on a group page, so all members can add their point of view on the group project page, so using git is essential.
Editing files directly on Gitlab#
It is really simple and takes just a few steps. Open the file when you’re on Gitlab, then click on the blue tile Edit and select Open in Web EDI. You can now edit your files in markdown format (see below) from the intergrated Gitlab text editor.
Editing files from your local repository (using Git)#
This is the best way to work on your project, but you have to set some things up. Don’t worry, I will explain how I am currently writing theses lines from a file on my computer.
Note: It might seem obvious, but working on your files from your computer implies you got to have a computer. In my case I work at uni with an ipad, so I ain’t got any command prompt, which is essential to this whole process. Furtonately I have a computer at home!
Here are the main steps to build your working space on your device: 1. Install and configure git 2. Set up an SSH key 3. Clone your workspace 4. Get a text editor and learn to write in markdown 5. Get to work!
Install and configure Git#
Git is a distributed version control system. Still confused ? So was I, so I googled what this system does. It’s a system that allows you to copy locally a repository on the internet so you can work on the same files as a team. That is precisely what we’re doing in the context of the course. Git has the advantages of being free and open-source, meaning you have access to the code of the software and you don’t even have to pay for it! Wonderful isn’t it ? People can use Git to give birth to large-scale digital projects. Maybe you want a few examples ? Maybe you already heard about Microsoft, Google, Linux, Twitter, Netflix… Lil projects like that.
Maybe you already have Git on your computer ? Let’s check that immediatly. Go to your command prompt and type:
git --version
If git is installed, you get to see the version of Git you have. If you don’t, your prompt doesn’t recognize Git as a command.

Installing Git on your Windows device isn’t complicated. You just go to this Git page and click on Download for Windows, then follow the instructions. If you’re on windows like me, there exists a faster way. You normally have Windows package manager (or App Installer) since it’s on your computer by default. If you don’t, you can download it on Microsoft Store. If you do, go to your command prompt and type in:
winget install -e --id Git.Git
Now that you have Git installed, you have to configure it. Configuring git means assignate a username and an email adress so Git recognizes you as a user. In the command prompt, define your username:
git config --global user.name "Nikita"
and then you email adress:
git config --global user.email "nikita.aksakow@ulb.be"
You’re done already! To check what you just did, you can type:
git config --global --list

Setting up your SSH key#
An SSH key is a couple key-lock that binds together your Gitlab project and the device you’re working on. It is like a passcode so they recognize each other. In practical terms, it’s a pair of two very long codes of numbers and letters. One is private, and stays in your device’s files. The other one is the public key, and you will have to upload it to Gitlab.
First, let’s check if you have any working ssh key on your device. From your command prompt, go to the /ssh subdirectory. If this folder doesn’t exist you probably have no ssh key, and you’ll have to generate one. In your terminal, run this command:
ssh-keygen -t rsa -b 2048 -C "comment"
The “-t” is to indicate the type of SSH key, here I created a RSA 2048 key (you can also generate other types of key, they all work). You can also add a comment to your generation. The prompt should return:
Generating public/private rsa key pair.
Enter file in which to save the key (/home/user/.ssh/rsa):
You now have to select the file where your key will be stored. After that, you can also choose a passphrase, but it’s optional.
You now have an SSH key pair! It is composed of a private key, and a public key (which ends in .pub). Find the folder you selected earlier and copy your public key. Now go to your profile page on GitLab, and in the left toolbar, click on SSH keys. You can see all the key you already have (normally 0). Click on Add a new key, and copy your public key code in the main box, scroll down and again, click on Add a new key. Congrats, your key is up and working!
Clone your workspace on your device#
You now need to clone every file you want to work on in a folder of your computer. Go to your project main page, and click on the Clone blue tile. You copy the link under Clone with SSH. It should look like this: git@gitlab.com:fablab-ulb/enseignements/2023-2024/fabzero-experiments/students/nikita.aksakow.git All you have to do is run this command:
git clone git@gitlab.com:fablab-ulb/enseignements/2023-2024/fabzero-experiments/students/nikita.aksakow.git
Your files are now in a folder named nikita.aksakow (if you were me).
Markdown format and text editors#
Its good to have all your workspace on your device, but if you want to actually work on these files, you got to have the tool to do it. The text you read here is written in markdown format. It is also the case of the files you just cloned. (they have a .md extension) Thanks to this I can write titles, bold text or italics. I can also put some images/videos on my website, and add some external links as well. This format is really useful in building websites. If you want to get familiar with this type of writing, you can follow this tutorial.
You also need a text editor to write everything in your files (that is the tool I was talking about). The one I am using is VSCodium, but you can use a simple text edit app you have on your device (it is going to be less comfortable tough), or Visual Studio Code, like many of my classmates. Downloading VSCodium was harder than I though, so I will tell you how I did that: If you go to the VSCodium website, you can click on download latest release, which will bring you on a github page with many different versions, for each OS (Windows, MacOS, Linux,…) Being on Windows, I would’ve download the VSCodiumSetup-x64-1.83.1.23285.exe or VSCodium-x64-1.83.1.23285.msi version, but they weren’t on the page when I tried to download it. I found another way to install it using Windows Package Manager. All I had to do was to go on my command line and enter:
winget install vscodium
Let’s get to work!#
You’re done setting up your workspace!! Let’s see how you can work from your device now: go to your repository using cd nikita.aksakow, or whatever you repository is named, in the command prompt. Run the following command:
git pull
This will download the eventual modifications made on your Gitlab project but not on the local files. It is capital to do it if you’re working with other people on the same project, to avoid clashes. However, if you’re working alone for now, you should get this Already up-to-date. message.
Now modify the files using VSCodium or any other text editor. Don’t forget to save of course! When you’re done working, your can type:
git status
This command will allow you to see every file you have edited. They appear in red because they aren’t the up-to-date with the gitlab files. For example, before this screenshot, I modified the module01.md file.

To update the files, run this command:
git add -A
The -A part is to update all the files. If you want to add only some files, you can type their names after add. If you run git status again, you will see the updated files in green. You now have to add a comment to the modifications you made so later, you can track the different steps of your project. This is how you do it:
git commit -m "yourmessage"
The last step is to send all your work on the Gitlab project, also said “push”:
git push
Last thing is to go to your page to see if the modifications appear online. Congratulations!
Stay frugal#
One last thing: storing your data spends energy, so the lightest is your documentation, the more you spare the planet! This is why I explain how to compress images to keep my storage low. What exactly is compressing an image ? Excellent question! Let’s take an example. If I want to put on my website this shrek image, it’s going to appear like this:

We all love shrek, but maybe it’s not capital that he appears so big on the website. It’s currently 1124x463 pixels and has a file size of 102 Kb. Let’s learn to make it a smaller image, and a lighter file.
There are plenty of ways you can do that. Any graphic editor (Gimp, Photoshop,…) includes this functionality, maybe even the one you have on your computer by default. I chose to use GraphicsMagick because it allows you to resize your images by entering a command, which is pretty cool. If you want to look cool and smart as well, follow these instructions:
First, install GraphicsMagick. Let’s now try to compress an image: first choose the image you want to resize and with the command prompt, go to the file location using cd. Now type in this command:
gm convert -resize 300 shrek.jpg littleshrek.png
Here I compressed the file shrek.jpg you just saw above into a new file littleshrek.png with a 300 pixels width. In the same folder as the original image, you should find the new one. You can now delete the old shrek.jpg file. I didn’t specify the height of little shrek because GraphicsMagick calculates it by itself so the image keeps the same proportions. If you’re a good observer you also noticed I changed the .jpg file into a .png file. Why so ? Just to show you you can do it if needed. Pretty handy.
I know you’re dying to see little shrek so here it is, now weighting no more than 74,4 Kb:

2. Project management#
During one of the first classes we were taught some project management principles, which will be very useful to complete the class website, but most of all during the group project in the second part of the course. It was instructive even if we already have a project management course in bio-engineering (BING-F-406) because we learnt different things. Here are some of my notes of these concepts.
As-you-work documentation#
This concept is very specific to this course where we have to document our progress on a website, but this work attitude is crucial to apply if you want a well-done, complete website. Even tough it takes times, you learn a lot about new documentation tools, but also about yourself and your way to work. Always helful. On top of that, if you forgot how you did something, you can always check your website to see the procedure. Another advantage is that if you’re blocked on a challenge in the course, you can read the documentation of other students from the previous years and learn how they did it. Being helped by previous students on how to help the next students feels nice.
Fail fast!#
That mentality made a lot of sense in my mind. Denis showed us this and my tutor in BING-F-406, Prof. Debaste, mentionned it as well in the context of our project. This principle relies on the fact that you learn more when you fail than when you succeed. “Failing” here means testing what you’re creating, and it doesn’t work properly. If you do that often your creation will be more resilient and well concieved as you confronted it to challenges a lot. On the other hand, if you work for a long time on a project without never testing it, if it fails at the end you may not understand at which step(s) the problem(s) is(are). Additionally, you will have to work even longer to solve the issues.

Spiral development#
This is an very interesting principle. This methods advises you to work by iterations when you develop a project. How ? The 4 steps are on the image:
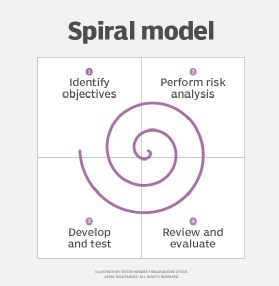
After your first set of 4 steps, you can start a new one, more complete and ambitious, because you’re stronger and more confident from what you learn during the first loop. The next loop can always go further because you’re experience-fed from all the other iterations. Another advantage is that if you have something unexpected and you have to present your work before you finish, you can show a whole thing, even if pretty simple, rather than a piece of a complex project. It’s kind of the same principle when you draw: first, you sketch your subject, then you add the details, and the colors in the end. Beautiful metaphor, isn’t it ?
Other stuff#
Parkinson’s law:
“Work expands so as to fill the time available for its completion.”
This law is helpful to keep in mind, especially when planning your work. It put it here so I won’t forget it. It really reflects the humand mind: if you have a week of work and 1 month to do it, you’re going to spread the work across the month so it’s not too exhausting, rather than working the 1st week and then doing something else after. That state of mind is not a problem as long as you don’t procrastinate and do all the work in the last 5 days.